|
ivsBatchConverter User Guide
ivsBatchConverter
(c)2006 IVS - Interactive Video Sytems
BY INSTALLING OR USING THIS SOFTWARE PRODUCT, THE USER
ACCEPTS TO BE BOUND BY THE CONDITIONS OF THESE SOFTWARE
AGREMEENT.
ivsBatchConverter software product is protected by
copyrightlaws and international treaties, as well as other
intellectual property laws and treaties. The software is
licensed and not sold.
The software application and this reference manual are
licenced 'as is' and without warranties as performance or
merchantability. The software application is licenced
without express or implied warranties whatsover. Because of
the diversity of conditions and hardware under whic this
program may be used, no warranty of a fitness for a
particular purpose is offered. The user is advised to test
the application thoroughly before relayng on it. the user
must assume the entire risk of using this program. any
liability of seller or manufacturer will be limited
exclusively to the product replacement or refund of the
purchase price. Information containin this document is
subject to change without notice.
This guide v.1.1 is referred to
ivsBatchConverter version 1.6.4.2
All the pictures and the text included in this guide
cannot be reproduced in any form, by any method without
written permission by IVS - Interactive Video Sytems
TRADEMARKS
All brand names, product names, file formats or trademarks
reported in this document are property of their respective
holders.
Introduction
Digital Revolution introduced many advantages in the video
industry; the last step, the transition from tape to file of
video data is now becoming reality. Files aren't all
identical, they differ for size (resolution), compression
and aspect ratio. ivsBatchConverter allows you to convert any
video file into .dps file format of your Leitch NLE system,
preserving the original file quality but pushing speed to
the max at the same time. It uses the most advanced
tecnologies available today, using 100% of your computer
processing speed. The faster the CPU the faster the
conversion; the speed is multiplied by the number of CPU
cores. ivsBatchConverter allows you to add video filters and
advanced corrections to your files during conversion. You
can correct aspect ratio (e.g. from 4:3 to 16:9 or
vice-versa), color space, resolution (e.g. HDV or HD 16:9
files to .dps SD 4:3 PAL or NTSC), add high quality filters
like GLOW, BLUR and SHARPEN and even convert a PAL file to
NTSC or vice-versa (with frame rate limitation). The
software allows the user to
choose any
aspect of processing; if you're not too familiar with Aspect
Ratios, color space and field handling, you'll find in this
quick guide all tutorials you need to make your specific
conversion.
Minimum system requirement are: Win XP Sp2 or Windows 2000
Sp4, 512MB RAM, any CPU speed, some space on your HDD.
Recomended system requirement are: Win XP Sp2 or Windows
2000 Sp4, 512MB RAM, recent CPU with SSE 3 instruction set (better
dual processor or multicore), fast HDD.
ivsBatchConverter Quick Start
To
simplify file handling, ivsBatchConverter has a project structure
similar to the most advanced NLE systems. Starting the
application, the first window is "STARTUP", that allows to
decide to create a new project or to open an already created
one (the 3rd button allows to open a project from a list of
the most recent used ones).
As the most advanced NLE
software, creating a new project, ivsBC will generate both a
project file ( in .ibl file format) and a series of folders
that will help to manage the converted files. Automatically
new files to be converted will be addressed to the defined
project path. If user wants to address one or more files to
different folders, he can do it at any time.
To start our first project,
let's click on "NEW PROJECT BUTTON" of startup window.
In the "Project Name"
window we have to specify the name of the project. ivsBC
will generate a folder on the path specified in the field "Project System
Folder" and a project file (e.g. test1.ibl). Converted
files, video and audio (.dps and/or .dva and .wav) will be
addressed in the auto-generated sub-folder "MEDIA".
NOTE: "Project System
Folder" must be a path on a system drive (e.g. other
than P:)
To specify different paths for
video and audio converted files, it is necessary to enable "Create Audio and Video
Subfolders" checkbox; The same to create the .dps files
on the P: drive (as you know P: can get just .dps files on
it)
Clicking on "Save"
button, the main program starts with its window, with
titlebar displaing ivsBC version and project path.
ivsBC allows you to create a
list of one or more files to convert. Files will be
converted sequentially.
The button "Add
New" opens the window "SELECT SOURCE MEDIA FILE".
Using windows tools for multiple selection (click + CTRL or
SHIFT) it is possible to add more files per time.
File format supported
are AVI,WMV,ASF,MOV,MPG,VOB,MXF,LTV, DPS. The DPS one is
supported as source file too, since you can use ivsBC to convert
aspect ratio or to add special FX like GLOW or BLUR to your .dps
clips. To avoid confusion with already converted files, to show
the .dps files present in the current folder, it is necessary to
switch the field "FILE TYPE" from media files to DPS
files.

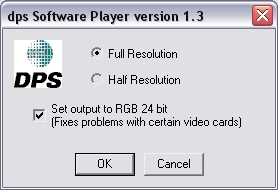
WARNING: For a correct conversion of DVA/DPS files (as
sources) it is mandatory to install the dedicated decoder (DPS Player -
from www.leitch.com ) and to configure it as shown in the
following picture (once installed you can access it from
Windows control panel). It is important to set it to Full
Resolution since by default the dps Software Player is set
to Half Resolution.
When some files are added, the
list to be converted will be as the next picture .

The list is organized from a series of rows subdivided into
columns, where each row is related to each source file.
The columns are : Source File,
Dest Video, Dest Audio, Status.
The first column "Source File" shows a checkbox
and filename. The checkbox allows to include or exclude the
files from the conversion process. Adding or Appending
new files at the list, the checkbox is checked automatically. After
the conversion end, the checkbox is unchecked automatically.
The columns "Dest Video" and "Dest Audio"
show video and audio file paths of the converted file.
Doubleclicking on the target audio or video file name
of any file, it is possible to change individually file name
and/or the entire file. This trick can be useful to
play/check the target file after the conversion (right
clicking on the derired file).
The column"Status" reports if the conversion
process must be started (Wait), if ended successfully (Done) or
if aborted for errors (Error).
All files added to the file list will be converted using the "Default"
settings of the current project. Default settings can
be modified at any time using the DEFAULT button, but be
careful, since files already in the list will keep their
settings (the default setting at the moment of their addition to the list). Files
already in the list can be easily converted to the new
settings by selecting them (with multiple selection too) and
pressing the button "Set Selected as Default"
To access to conversion settings of any files we have to
double click on the desired file name on the list: the
window "Conversion Properties" will appear
as in the next picture.
The "Conversion Properties" window is
structured in 4 sections:
DPS WRITER: it defines all parameters required to create .dva, .wav
and .dps files. Starting from the top section is possible to change files
destination paths and to choose the audio file format, among .WAV
(standard windows audio file) or DVA (standard Leitch/DPS audio file
with link to the associated .dps video file). The option "Create DVA also
w/o audio source" allows to create DVA file even if the source A/V file
has no audio.
TIMECODE and Reel Name are important data for video
professionals; they are necessary to recapture clips too. IvsBatchConverter
allows to add a TIMECODE to the converted file with two options. The first
one allows to the user to specify a numeric timecode in the HH:MM:SS:FF
fields, the second one (conversion start time option)is to add a
timecode starting from the system clock. The Reel Name field allows
to add a name for the REEL.
“Play and Edit while Rec" is one of the main features of
ivsBatchConverter. This options allows editing the file before the end of
the conversion, creating a full .dps file when the conversion starts. At the
beginning all the frames are black, but during conversion these frames are
replaced by source movie ones. It is possible to choose to convert a part of
the movie setting the desired “MAX FRAME” number. This file can be
added immediately in the Velocity gallery and timeline to be edited or to
verify the result of specified settings before waiting for the end of the
file creation. Sub-section "Codec Properties" allows to set other
values of the DPS files: Video Standard (NTSC or PAL), Bit Rate (compressed
in KBps or Uncompressed 20500 Kbps), Alpha Channel and its data rate. If the
Alpha channel checkbox is flagged, the software will check if the file has
the Alpha and will generate the additional channel. Quicktime files are an
exception since the software can't detect if the file has alpha channel or
not. For this reason if the Alpha option is enabled the converted .dps file
will have the alpha (a full white alpha) if the Quick time file hasn't it.
SMP OPTIMIZATION: This section allows
setting up the best speed for every system. "Two threads per CPU" is the best choice for today's CPUs.
VIDEO CONVERTER: This section is the most important and sofisticated one, and to be understood needs
a small introduction. All multimedia files have an “INFOHEADER” string where the softwares that generated them write main file features like aspect ratio (e.g. 4:3 or 16:9), frame/field handling (progressive or interlaced, Field1 or Field2 dominance), frame rate, etc.
This information is useful because it allows other software to read them. IvsBatchConverter reads and displays this info in the sub-section INPUT, moreover it adds info about frame resolution, making a file analysis. Unfortunately not all software writes a correct INFOHEADER (some don't write all informations or even write wrong things, especially on field handling or scanning!). For this reason it is very imporant to check the result if we don't know file source. IvsBatchConverter sets automaticallyu the two fields
AR (aspect ratio) and Interlacing on what he reads from INFOHEADER, but it is possible to manually switch the fields to other values.
OUTPUT: this sub-section allows to set file OUTPUT features. The first field shows the output INFOHEADER without frame rate, since all generated files will be PAL (25fps) or NTSC (30fps). AR (aspect ratio), Interlacing and field handling are set as default on AUTO, i.e. They follow INPUT settings. If we want, we can vary one of them; for example if we have as source a 16:9 file and we want a 4:3 file as output, we will set here 4:3.
RESIZING allows to set the best way to make resizing. If we process a file with same features (size and AR) both on INPUT and OUTPUT there won't be any resizing processes, but any change, even just an aspect ratio variation needs for a resizing process. IvsBatchConverter integrates the most advanced features to preserve file quality. Here are the options.
"Preferred 480 to 486" NTSC standard frame format is 720x480, while .dps NTSC frame format is 720x486. Stretching a 720x480 to 720x486 can degradate quality, adding a not necessary resizing. IvsBatchConverter adds the option to not resize a 720x480 multimedia files to fit the not standard .dps 720x486, adding 6 black lines. You can check, this small tip saves quality a lot.
"Keep Aspect" field allows to specify the kind of correction if AR INPUT and AR OUTPUT are different. There are three possible options: None (no change), Letterbox/Pillarbox and Crop Image. The next pictures will help to understand these options.
Conversion from AR 16:9 to AR 4:3 Crop Image

Conversion from AR 16:9 to AR 4:3 Letterbox

Conversion from AR 4:3 to AR 16:9 Crop Image

Conversion from AR 4:3 to AR16:9 Pillarbox

"Interpolation" field defines the resizing algorithm in case of file Aspect Ratio and/or file size variation (e.g. Converting an HD File 1920x1080 16:9 to PAL 720x576 4:3, or just an AR variation from 4:3 to 16:9). According our needs we'll choose between:
-
NEAREST: Faster processing with lower resulting quality
-
LINEAR: A bit slower then NEAREST but a bit better as resulting quality
-
CUBIC: Resizing for small size reduction, very fast
-
LANCZOS: Similar to CUBIC
-
SUPERSAMPLING: The best selection for Aspect Ratio variations “CROP EDGE” mode, without resolution changes
-
CUBIC+ : The better quality/performance ratio to scale HD to SD
-
MULTIPASS LINEAR: A bit better than CUBIC+, but slower
-
MULTIPASS BLACKMAN: A bit better than CUBIC+, but slower
-
MULTIPASS HAMMING: Very similar as CUBIC+ in quality and speed
-
MULTIPASS GAUSSIAN: The best one for size reduction but the most CPU requiring too
The option of "Field Swapping" allows to make an important operation on field handling (e.g. AVI DV PAL files have an inverted field dominance, as well NTSC to PAL and vice-versa transcoding where field dominance must be swapped from Field 2 to Field 1). This option will act if input and output "interlacing" fields are different. TUTORIAL section of this guide has several suggestions for any needs.
BANDWIDTH TRIMMER allows the user to adjust image detail level. Enabling the checkbox, the user has an operational range of detail from -50 (very blurred image) to +50 (very sharpen image). Using moderate sharpening values (e.g.+20) images coming from low end camcorders can get a “professional look”.
"BLACK LINES" option overwrites black borders to the clips, very useful to “hide” image defects often displayed in the overscan area, or to add a “cinemascope” FX to the image.
GLOW: Allows to enable/disable a broadcast GLOW FX to the file with Glow Size, Intensity, blending, gain, brightness, contrast
and indipendent black/white levels. Please note: these
additional controls appear only into ivsBatchConverter
PRO edition. It have also a source trimmer.
TUTORIALS:
Convert an AVI/MXF DV PAL file to DPS PAL.
After adding an AVI o MXF DV PAL file to the list, double click on its file name and set options as follows:
NOTE: Be careful to Interlacing and Field Processing. DV PAL files have a dominance on Field 2 and scansion lines shifted up by one line against normal PAL standard.
Convert an AVI/MXF DV NTSC file to DPS NTSC.
After adding an AVI o MXF DV NTSC file to the list, doble click on its file name and set options as follows:

NOTE: If the source NTSC file is made of 480 lines and must be converted to NTSC 720x486, the only possible Aspect Ratio is “Square Pixel”. That won't produce Aspect Ratio problems in the destination clip. Currently it is not allowed to make aspect ratio changes.
Converting a DPS PAL or NTSC file with AR 4:3 to a DPS PAL with AR 16:9 CROP IMAGE
Please add a PAL or NTSC DPS file to the list, double click on its name to get the
"Conversion Properties" Window. In the next picture there are the right settings to just change aspect ratio of a DPS file.

NOTE: The input INFOHEADER is always wrong for any DPS
file so for all interlaced footage it is required to force
the input interlacing field on FIELD 1 for PAL
sources and FIELD 2 for NTSC sources.
Converting a DPS PAL or NTSC file with AR 4:3 to a DPS PAL with AR 16:9 LETTERBOX
Please add a PAL or NTSC DPS file to the list, double click on its name to get the Conversion Properties Window. In the next picture there are the right settings to just change aspect ratio of a DPS file.
NOTE: The input INFOHEADER is always wrong for any DPS
file so for all interlaced footage it is required to force
the input interlacing field on FIELD 1 for PAL
sources (as shown in the picture) and FIELD 2 for NTSC sources.
Converting a DPS PAL or NTSC file with AR 16:9 to
a DPS PAL with AR 4:3 CROP IMAGE
Please, add a DPS PAL or NTSC file with AR 16:9 to the list and double click on the file name to get the
“Conversion Properties” window. Then set the options as follows in the next picture:

NOTE: The input INFOHEADER is always wrong for any DPS
file so for all interlaced footage it is required to force
the input interlacing field on FIELD 1 for PAL
sources and FIELD 2 for NTSC sources.
Converting a DPS PAL or NTSC file with AR 16:9 to a DPS PAL with AR 4:3 PILLARBOX
Please, add a DPS PAL or NTSC file with AR 16:9 to the list and double click on the file name to get the “Conversion Properties” window. Then set the options as follows in the next picture:
NOTE: The input INFOHEADER is always wrong for any DPS
file so for all interlaced footage it is required to force
the input interlacing field on FIELD 1 for PAL
sources and FIELD 2 for NTSC sources.
Converting an HDV 1440x1080(mpg2T) 16:9 file to a 4:3 PAL LETTERBOX DPS FILE.
Please add an HDV 1440x1080@50i (AVI o mpg) file to the list, and as usual double click on file name to get the “Conversion Properties“ window, and configure it as in the next picture:

NOTE: Please check always the input INFOHEADER: as for any
DPS file also here it appear to be wrong so for all interlaced
footage it is required to force the input interlacing field
on FIELD 1 for PAL interlaced sources and FIELD 2
for NTSC interlaced sources.
Supported source file formats and related decoders:
ivsBatchConverter makes use of Microsoft DirectShow ® to be able to read files to be converted. Many programs under Windows ® Operating System make use of DirectShow ®; the best example is Windows Media Player.
Every video file type to be read from the DirectShow ® (and from Windows Media Player, as well as ivsBatchConverter) needs an appropriate decoder. These decoders, usually named “Directshow Filters” are in most part already installed in any Windows 2000 and XP systems, some others are added installing multimedia applications. The user, usually, doesn't need to install additional ones, but the lack or the presence of low quality filters could suggest to add new ones.
Some are available for free, some other filters are provided from 3rd party companies. In the next pages there are the suggestions for all file formats and their decoders needed by ivsBatchConverter. Please remember that you'll be able to convert what you're able to read with Windows Media Player.
3GPP (3gp) - Requires filters from thirdy party
developers. It is possible to decode it installing Apple
Quicktime.
AVI (.avi) – AVI files differs for CODEC. To be able to read an AVI file the system needs the codec used for file encoding
MXF (.mxf) – MXF could need an external parser, there are free versions available from 3rd party producers:
please visit
http://mxf.snellwilcox.com/ (to download mxfdesktop 1.20)
QUICKTIME (.mov) – Need for Quicktime 6.5 or newer or Quicktime Alternative.
DPS (.dps) – Needs for a decoder available from Leitch's web site
www.leitch.com:
(DPSPLAYER16.exe) Warning! it is important to set the DPS
software decoder on "full
Resolution" because as default it is setted on Half Resolution resulting
in very poor quality dps files output. Please read more
here.
DV (.avi, .mov, .mxf) - avi DV is part of windows; for .mov and .mxf see above
DVCPRO (.avi, .mxf, .mov) - DVCPRO 25Mbps is integrated in Windows; for .mxf and .mov see above
DVIX(.avi) - Requires Dvix filter.
www.dvix.com
H263 - Requires filters from thirdy party
developers.
H264 - MPEG-4 Advanced Visual
Coding (MPEG-4 AVC). Requires filters from
thirdy party developers. please see at
http://developers.videolan.org/x264.html
HD-CAM
-
HDV (.avi, .mov, .mpg) – Usually requires additional MPEG2 filers for .avi and .mpg , while Quicktime 7 per .mov
IMX (.mxf) – Requires both filters MPEG2 TS and MXF
LEITCH (.ltv) – Requires appropriate filters for the file format of Leitch Altitude board , available on
www.leitch.com: Warning! it
is important to set the LTV software decoder on "full
Resolution" as for DPS player. (as default it is setted on Half
Resolution)
MPEG1(.mpg) - Basic filters are built in Windows.
MPEG2(.mpg) - Requires filters from thirdy party
developers. We recommend Ligos filters for Quality or Elecard
filters for speed.
MPEG2TS(.m2T) - Requires filters from thirdy party
developers. We recommend Ligos filters for Quality or Elecard
filters for speed.
MPEG4(.mp4) - Requires filters from thirdy party
developers.
PROHD (.avi)
- Requires filters from thirdy party developers.
REALMEDIA (.rm) – Requires additional free filter as Real Alternative
VOB(.vob) - See MPEG2
XVID(.avi) - Requires XVID filter.
www.xvid.org
XD-CAM (.mxf) - See MXF
WMV (.wmv) – Doesn't requires additional filters, since it is part of Windows.
Some variants could require codec update from internet.
TROUBLESHOOTING:
MPEG2 – Conversion stops before the end (with or without errors): This is due to unappropriate filters and can be easily fixed installing updated MPEG2 directshow filters.
MPEG2 – Conversion goes in loop: Using some directshow MPEG2 filters, conversion begins again before reaching the end in an infinite loop. This problem is determinated by old directshow filters and can be fixed installing updated ones.
REALITY & PLAY and EDIT while REC: The dpsReality Board and its related software Velocity v.7.6 or 8.2 support “PLAY and EDIT while REC” feature if the destination file is saved on the dedicated P: drive only; trying to edit during Recording a .dps file saved on another system drive, will produce an error and editing will be possible when conversion ends only.
NOTE: Velocity 7.6 supports “PLAY and EDIT while REC” feature of .DPS file only; the .DVA file is supported at the end of conversion only.
REALITY and low speed conversions on P: drive. Usually this is due to a not fully compatible system. The REALITY board has a bandwidth on the PCI bus of 5-6MBps. This bandwidth is available if the system is perfectely compatible with the Reality card. When compatibility is not full, Reality won't be able to communicate properly with the system. The result will be a lower speed in receiving and sending datas through the PCI bus. The resulting bandwidth will be about 1MBps, sometimes enough to handle audio datas to be sent to Reality audio outputs during standard editing, but not enought to allow realtime MPEG2 exporting or ivsBatchConverter max speed. As you can imagine, we strongly suggest to install the Reality card in a full compatible system, since all the features will be be improved. One of the best test to check Reality/system compatibility is standard MPEG2 exporting that must be made in REAL TIME.
GREETINGS:
Special thanks for all the
feedback received including suggestions and bugs reporting to:
Craig Townsend
(He helped us also to fix
errors on this guide!)
John David Hutton
Ulisses Simionato
|